
Sequencing Maschine Drum Tracks with Ableton Push Controller
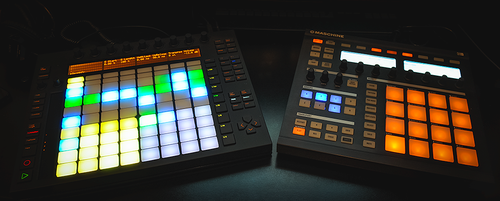
This is a guest post from a Blend.io user, TekMonki, who’s published a template project which uses a powerful and time-saving technique for getting Ableton’s Push controller to play along nicely with Maschine when used as a VST plugin.
I’m a big fan of Maschine’s sounds and expansions, but getting clips from Maschine to Live is not most efficient or intuitive for my workflow. Mainly, there is a bit too much duplication of efforts and I thought it would be great if I could use the step sequencing feature of the Ableton Push controller to control the Maschine VST and subsequently anything loaded in one of it’s groups (drum kits, synth sounds, etc). It turns out that it is possible. I came up with a solution which is a bit of a spin on something I learned from a tutorial posted on Ableton and NI’s forums, as well as maschinetutorials.com by St. Joe regarding integrating Maschine into Live. It has been working well for me and it’s currently my main Live template.
The Setup
In Live:
Create a Midi track and name it Maschine A.
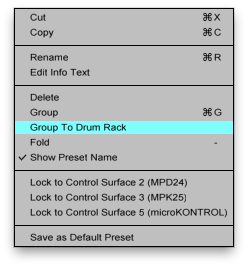
Put an instance of Maschine on the Maschine A track, right click on the instrument and select Group to Drum Rack in the menu.

Set Maschine receive in drum rack to All (click on the I-O button on the bottom left of the Drum Rack to expand to see this menu).

In Maschine:
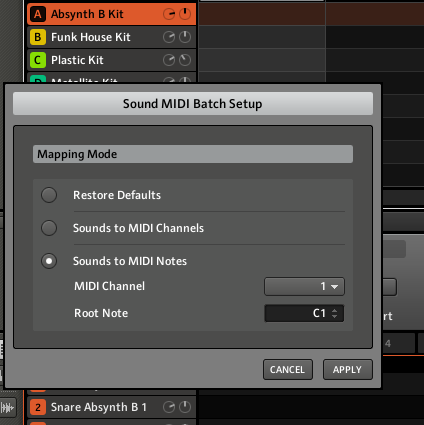
On the group you are using, click the downward triangle tab and in the menu select Sound MIDI Batch setup.
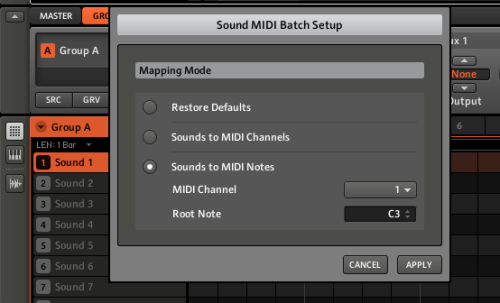
Click on Sounds to MIDI Notes, then apply.
You can now trigger and sequence that group using the Ableton Drum Rack and Ableton’s clips!
If you want to have multiple groups triggered independently each from their own Ableton Drum Racks on dedicated tracks, this is also possible using these additional steps:
In Live:
Create 7 additional Midi tracks and name them Maschine B, Maschine C, Maschine D, etc;, The letter is to reference the Maschine group.
Select all 8 tracks and group them (Command-G). Name the group Maschine.
Add an Ext Instrument to B, C, D, Etc.
Set each Ext Instrument MIDI To: Maschine A and then the associated Maschine output - for example doing this for Maschine B, the 2nd dropdown in the external instrument should read 2 - Maschine. Do the same for C (would be MIDI to: Maschine A and 3 - Maschine), and D, and how many other Maschine groups you plan on using.
Set the Audio From in the external instrument to the corresponding Maschine external output. For simplicity this should be the same number as the midi channel for that group: Maschine B’s external instrument will read Audio From - Out 2/-Maschine. Therefore Maschine B will be on Midi channel 2, AND audio from Out 2/-Maschine.

To make each Ext Instrument function as a Drum Rack (note this is with using Push’s drum rack mode in mind), right click on each Ext Instrument and select Group to Drum Rack. Follow the same steps as in Maschine A with regards to the receive in the Drum Rack (all).
In Maschine:
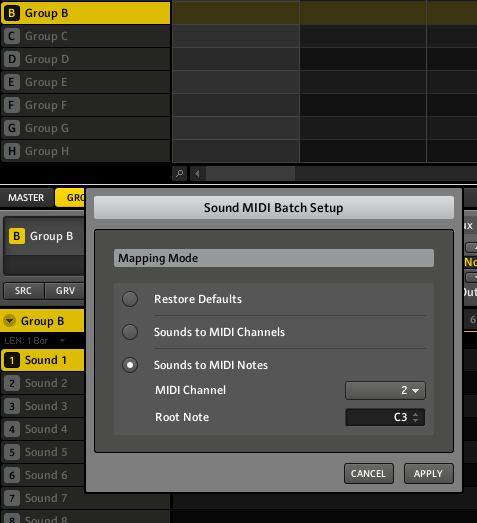
Starting with Group B, click the Group tab in Maschine and then the Out tab. Set the Main out to the associated channel. E.g. B would be 2, C would be 3, D would be 4, etc.
Click on the downward arrow as with Group A and select Sound Midi Batch Setup and click Sounds to Midi Notes as you did with Group A but this time select the midi channel for the corresponding group. Like in the previous step, B would be channel 2, C would be 3 etc.
Now you can have potentially 8 separate Ableton drum racks, each controlling their own group in Maschine controlling everything with just the Push! That said, if you don’t have a Push yet you don’t need to be dissuaded from trying this out. One of the guys from Blend mentioned they’ve been waiting on theirs, but tried this setup out without and it worked great just for sequencing Maschine sounds from Live on the setup’s own merit.
Good luck and hopefully you’ll find this technique helpful in some way, even if it’s just a jump off point for your own setup.
How to get this template
Join the Blend community for free and pull TekMonki‘s project demonstrating this technique in seconds:
(Use the invite code: BLOGPUSH to sign up for Blend.io if you don’t have an invite or haven’t signed up yet.)
Many thanks to TekMonki for discovering, documenting and sharing this workaround. We hope you find it as helpful as we did!
**UPDATE** - We’ve created a new profile on Blend.io where we’ll collect useful Ableton, Maschine and other templates going forward. Already posted on it is a stripped down version of this template using only the stock Maschine sounds. Log in to Blend.io to quickly pull this essential starter project: Push-Maschine-Template
Keep an eye on blend.io/templates for more of these, and let us know if you have or come across other useful workarounds.
Another Tip: to make the Maschine groups line up perfectly with the drum rack configuration on the Push, When in Sound Midi Batch Setup change the root note to C1 as shown below:
Follow us on here and on Twitter (@BlendHQ) for more tutorials, product updates, reviews and more.
36 notes
youhavejamesgibbs liked this
juliandmc liked this
tethre liked this
everythingisterrible liked this
simplyfsc reblogged this from blendhq
 vadim-august liked this
 eternityahead liked this
 waaaveess liked this
 specialkaosatl liked this
Great read
forbinmusicco liked this
 innumerable-consonance liked this
 thecopilots liked this
 ohyeahpaulchin liked this
 grrlmusic liked this
coolchome-blog liked this
thefadedrainbows-blog reblogged this from heezyduzit
heezyduzit reblogged this from blendhq
mekayama reblogged this from blendhq
evilmambo liked this
cxvill reblogged this from blendhq
 patellinger liked this
 djseap reblogged this from blendhq
blendhq posted this